SharePoint Online Look & Feel Settings
Over the past few years with the newer SharePoint versions, the navigation of the site content was slightly improved, the standard settings allow a nice and rich look & feel, with customizable navigation bars, site themes, and why not third party tools to extend the user experience, but in general things have not changed much.
This is perhaps an area of improvement that Microsoft can pay attention for its future releases, but in my opinion it gives room for developers to create custom features allowing an improved user experience.
In this article I will show the features available on a SharePoint site to configure and improve the look & feel of the site, including some modern navigation techniques that helps the end users to find and consume their content.
First, you can access these settings going to “Site Settings” (under the wheel options icon), and then under the Look & Feel section, you will find the different configuration options for this, as shown in the picture below:
Let’s take a look on each option.
Title, description, and logo
Here, as the link itself suggests, you can change the Site Title name (the one you see at the top-left corner when you navigate to the site), the description details that show below the title, and the ability to upload a cover image to display right next to this title, simple and to the point. No further configurations are available in this section.
Quick Launch
This is the left navigation bar that you see on your SharePoint Online site, here you can configure how you want the links to show, and to what URL to point them to. This navigation bar is very useful for a quick watch of the primary content of your site, such as some sub-sites, document libraries, lists that you need to easily have access to, or custom links you want to add to your site.
You will also notice that in the bar itself you have a link named “EDIT LINKS”, this is the secondary way to edit the links in the bar, if you don’t want to go explicitly to the Quick Launch settings.
Notice that not only you can add and delete links in this setting, you can also drag the links inside other links, and indent them if you want to group the links together, like the “Recent” and “DialogBox” links from the screenshot above.
Top Link Bar
Similar to the left navigation bar that was explained earlier, this Top Link Bar section is designed to allow us to edit the “horizontal” top bar, the one we see above the contents of our site, also known as the “breadcrumbs” of the site. We can create any links we want, not only to point to our content, meaning with this that we can use any URL. Particularly Useful to quickly navigate to other places, such other sites in the Intranet of your corporation, or why not the URL of a site outside of your organization?
One detail to consider, we cannot indent links inside others like in the left navigation bar, in this bar we are only allowed to create one link next to each other. On the other hand, we can also quick edit the links directly on the bar, similar to the other navigation bar.
Navigation Elements
In this section we can configure two components:
- Quick Launch
- Tree View
The Quick Launch, as explained above, is the left navigation bar. We can simply enable or disable it if we don’t want anything to be shown at the left side of the screen in our SharePoint Online sites. Keep in mind that if you disable the component, the space that it occupied before will still be there, as an empty space. This way you don’t have to worry about breaking the look and feel of your site, as the structure will be kept intact. This of course can be edited with custom coding, if you want to make that empty space disappear, but that is a discussion for a more advanced topic that we won’t touch here.
The Tree View is, as the name suggests, a simple tree view of the content of your site, showing your Lists and Document Libraries, along with its folders. This feature is limited but it can help to make your navigation a bit easier.
However, it is strictly limited to allow you to see only the high level structure of the site. There is a nice and modern tool that functions similarly like this navigation bar, but with a much more extended usability. It’s name is FlyView for SharePoint, which can be installed as an extension for your favourite browser or your server if you have a big farm.
The screenshot above speaks for itself. You can navigate the entire content of the site (and their sub-sites) just by browsing the navigation bar through its fly-out menus, and going as deep as the document library files and list items. If you are an end-user who needs a quick and modern approach to access the content in the site, I think this is a pretty interesting tool to aid in your needs. We all want to have a simple way to access our stuff anyways, right? SharePoint sometimes can be hard to understand, and it also can be very unfriendly if you don’t know how to properly show the content in your site, but glad we have these third party tools that make our lives easier.
Going back to the standard Tree View, it does its job for a simple and limited navigation, but we can’t do much more with it.
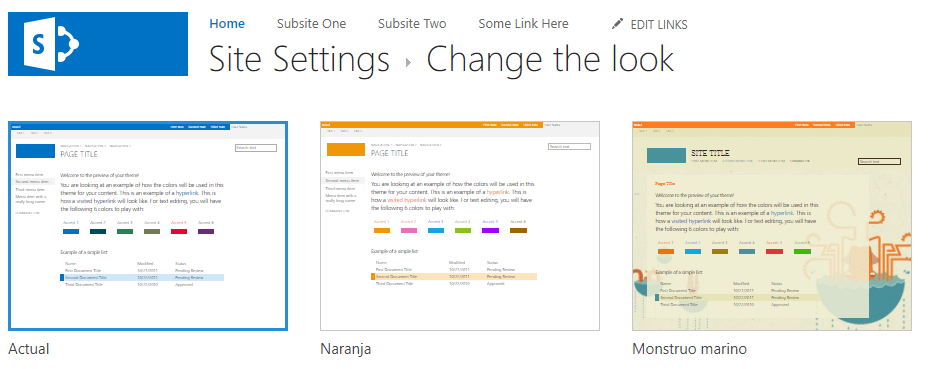
Change the look
All the configuration settings we talked about earlier, are meant to change the structure of the site, to allow a faster and easier navigation to its components. However, we’ve not yet discussed anything about the real “look and feel” aspect of a SharePoint site, and by this I mean the style and colors we can set to extend the user experience the best we can.
This section is exactly to configure this, we can add site themes to our site in order to change the font colors, background, general style features, etc. If you are familiar with WordPress, then this part will come very familiar to you, since you can easily customize the style of the site using these standard themes, and not worrying about breaking anything from its structure. This is all the “cosmetic” part of the site.
You will notice that the list of themes to choose is not large, mainly because this is not the general purpose for a SharePoint site, to have the ability to manipulate things very much. This is quite opposite for WordPress sites, but it’s designed for a very different audience.
If we want we can extend these Site Themes with custom coding, in the case we need to add colors, or change the style in a custom way. But as mentioned above, these custom features are a discussion for a more advanced topic.
I hope you have now a better understanding on these topics, there is a ton of things we can do to improve the navigation of our site content, and it is important to plan ahead if we decide to implement these components properly.






Leave A Comment